Showing posts with label how-to. Show all posts

Friday, June 7, 2019

How to Use Clipping Mask and Gradient Tool in Photoshop

In this post, I will be giving step by step instructions on how to use a clip mask, gradient tool, and a little about layers in Photoshop. I have an older version (CS2), so some of the following may not be found in the exact same locations if you are using a newer version (or a Mac) ;)

First, here is my finished page (Bonus addition at end of post!):


 And here’s how I got there….


Step 1:

Open Photoshop. Go to File and select New:


A pop up screen will appear. I set the size to ‘Letter’, which is a normal paper size, but you can use whatever size page you want!

After choosing your size, resolution (the higher, the better), and Naming your masterpiece, hit OK. A blank canvas will now appear:


Step 2:

Select the Text tool (T) and draw a box however big you want it, choose your font style and size, and type your text:


Step 3:
Make a new layer. You can do this by going up to Layer at the top of the screen and selecting new:


This is where I put a picture to use as background color for my text.

Step 4:

Then, to make the picture in the beginning of this post, I used a photo that I had taken down in the Caribbean. Go to File--Place and select a picture:


The picture will be placed on the canvas like so:


I then scaled the image by dragging the edges out to make it big enough to cover my text, and use the colors I wanted within the picture. Since I only wanted this picture for the colors, it didn’t matter that it ended up being skewed:


Step 5:

With this new photo layer active, go up to Layer again and select Create Clipping Mask:


This will make it so only a portion of the photo will be displayed through the text:


Make sure the layers are in proper order, like this, or it won’t work:

(picture on top (which in this screenshot is the active layer), then the text layer, above the background)

Step 6 (optional):

Now, the picture above looks good as it is, but I decided to add a little more color to it by using the gradient tool. Click on the Background layer, so the gradient will be behind everything else.
Select the gradient tool, and choose your color(s). I used both a blue and green color to make my gradient (and also changed the Opacity to around half, because I found if I used 100% it didn’t look as good). Then, use the cursor to draw a line in the direction you want the gradient to go, this may take some experimenting! You can always go to Edit and Undo if you don’t like it:)


BONUS Step 7:
At first, I was happy with this. Then I got to thinking: “That photo is too good to hide!!”. So I added it back in above the text (by creating a new layer above all the other layers) :


I think it turned out pretty well!

Always make sure to save your work periodically!

Have fun!

Rachael

#Photoshop #clipmask #tutorial #creativity


Wednesday, April 24, 2019

Packing Light: How to pack 1 carry on for a 9 day trip

As I prepare to go off on another adventure, I thought I would share with you how I pack my bag, and how I manage to only have 1 carry on bag to last a 7-9 day trip!

When I was a teenager, I read an article in some magazine that suggested rolling your clothes instead of folding them to save space...I have been doing so ever since!

First, I pick out the amount of shirts, underwear and socks I'm going to need. I usually end up wearing the same thing for the 2 travel days there and back, so that cuts down on space already! ;)

Then, I fold the shirts lengthwise, making sure the arms are folded in like so:


After this, fold underwear in half and put on top of shirt, then add a folded pair of socks (or you can leave the socks unfolded)


Then, roll them up, like you would a sleeping bag:


After I've rolled up around 7-8 of these, I put them in my trusty bag that I've taken with me all over the world for the last 15 years or so, making sure to have my passport and travel papers of course:


And then I add an extra pair of pants, some jammies, and my little zip lock bag of toiletries, as well as a book, snack and camera, and voila! A perfectly packed bag for a 7-9 day adventure!


Much easier than going through the hassle of checking a bag and hoping it makes it to your destination!

Happy travels!

Rachael

#travel light #adventure


Friday, April 19, 2019

Latchhooking 101

Today I would like to talk about latchhooking. An enjoyable craft most people can do! They sell all sorts of kits that come with the proper colors and amounts of yarn and the mesh with the pattern printed on it. All you need to buy besides the kits is a latchhook tool like this one:

latchhook tool
You can find latch hooks at stores like Michael's, Walmart, Joann, Herrschners and online at Amazon.  If you're feeling extra creative, they also sell blank mesh so you can make your own design, you'll just need to make sure you have the right size yarn.  They do sell precut yarn, but if you have some yarn you want to use that is not cut, this is about the size it needs to be (approx. 2.5 inches):

Yarn length, about 2.5 inches
I shall use a kit in order to display the steps needed to create your very own latchhooking masterpiece.

My mom got me this hummingbird latch hook kit for Christmas last year, and I just finished it not too long ago! Here's what the finished design looks like:

Finished hummingbird and flower latch hook kit
How did I get there?

One piece of yarn at a time!

First, you will need to wrap a piece of yarn around the latch hook tool like so:


Then, take your mesh, and put the tool through one of the squares. If you are using a kit with printed color designs on it, make sure you have the correct color:


Then, open the thin piece of metal on the hook and wrap the yarn around that:


Then close the latch, the yarn is now locked into the tool, and gently pull through the mesh:


The tool should then come free of the yarn. Then you can pull on the yarn to make sure it is secured to the mesh:


Then repeat until you are completely finished with the design!

I usually like to do 1 row at a time, which take between 15-20 minutes. It is a time consuming craft, but if you keep at it, doing a little at a time, you too can create a latch hook masterpiece!

Finishing Off

Most of the time I make my latch hook designs into wall hangings, but you can also put them on pillows and make rugs!

In order to finish off your project, you must sew the remaining mesh to the back of the design.

Fold over the remaining mesh behind the design, and using heavy thread and a needle, tack it onto the back. Make sure none of the blank mesh shows in front. Then you can decide whether to make it into a  wall hanging, which is probably the easiest, or a rug or pillow.

Once you tack on the remaining mesh to the back, you can attach a rug binding to the back to hide the yarn. I like to just leave it as is, since the backside will be facing a wall if you make it a wall hanging!

For a closer look at how to finish a latch hook project, check out this site here!

Happy latch hooking!

Rachael

#latchhooking

Thursday, April 11, 2019

Celebrating Easter with crafts and song!


As Holy Week approaches, I remember all the Easters past and reminisce about the traditions I grew up with...

Starting on Palm Sunday, we always had (and still do) Palm fronds at church to remember when people lined up along the road and welcomed Jesus into Jerusalem with Palm fronds, singing 'Hosanna!'


We would also sometimes make crosses out of the palm fronds. There are instructions on how to make your own palm frond cross here.

Then, in between Palm Sunday and Easter, we would make jello eggs, using real eggshells as the mold! My mom would make a small hole on top of the egg and take the insides out, then gently wash it in water and pour in the jello mix and let it set in the fridge. Then we would peel off the eggshell, and voila! Yummy jello eggs to enjoy:)  Here's how to make your own, using a mold.

We also used to dye eggs, and sometimes paint on eggs as well! Here's one that my sister made when she was a kid:


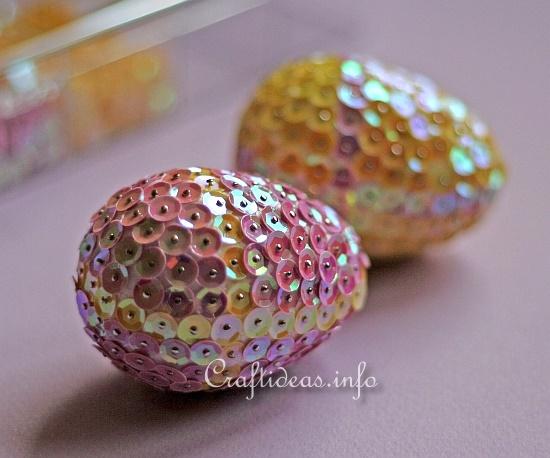
 And we would decorate styrofoam eggs with pins and sequins, like the ones pictured below:

Sequin Easter Eggs 1

On Thursday that week we sometimes went to a Maundy Thursday service, which is to remember the Last Supper, when Jesus and his disciples ate together before Judas betrayed Jesus and had him arrested.

Good Friday remembrances were next, when Jesus was beaten, mocked and killed on a Roman cross...dying for us all so we might have eternal life through him! All who accept Jesus' free gift of his own life for theirs will be saved from eternal death, and have eternal life with him in heaven! A life far better than this one could ever be:)

Here's Old Rugged Cross, one of my fav Easter songs, take a listen:


Then, early on Easter morning, we would get our Easter baskets, full of tasty treats like chocolates and jelly beans:)

Then we would go to the 'Sonrise' service to celebrate Jesus' resurrection, when he conquered death once and for all! We would have a skit about the morning when the women and disciples found that Jesus' tomb was empty, and later seeing Jesus before them with the wounds in his hands and feet and side that he took for us.

We would also sing several songs, like Because He Lives:


After this, we would have a big Easter breakfast at the church. Then we would go home for a couple hours and have a jelly bean hunt before going back to the regular morning service.

In the afternoon, we would have an Easter dinner with family before going on an Easter egg hunt. My mom also used to give us kids clues, which we had to follow until we found our present!

Easter is a good time to remember all the things Jesus has done for us, and to spend time with family and friends!

What are some of your Easter traditions? Please share in the comments below!

Happy Easter!

Rachael

#Eastertraditions #Eastercrafts

Friday, March 29, 2019

Quilling Basics

In this post I will be sharing a little about how to quill. If you are unfamiliar with what quilling is, a short history compiled by the North American Quilling Guild can be found here.

According to their website, quilling has been around for hundreds of years, and was used for decorating religious texts, and taught to women during the Victorian era along with embroidery!

My adventure in quilling began about 2 and a half years ago when one of my friends let me have her quilling starter kit. It was Fall, so the perfect time to start making Christmas presents!

 Some of the 1st things I made were quilled cards for my parents and some Christmas tree ornaments for myself. But my very first attempt at quilling was just practicing the basics, and after making several pieces, I ended up finding a way to put them all together in a nice little picture:

My 1st quilling practice

Quilled Cards
Here are the basic tools and supplies you will need to start your own adventures in quilling:
Colorful paper strips of varying sizes (ie. 3mm, 7mm); slotted tool; quilling comb (a regular wide toothed comb works too!); needle tool, or something to apply glue with; glue; scissors; tweezers for the trickier designs; and an imagination! Some people also find a quilling board, like in the above picture, to help them make different shapes. I have tried using one, but prefer to just manually manipulate the paper:)

There are other tools you can use to add texture and help guide the slotted tool more easily. There's also a 3D mold I've tried:
Crimping tool, slotted tool guide, 3D mold, and 3D flower I made using these tools
So let's get down to the basics.

First, there are 2 main tools you can use to quill: the slotted tool and the comb. Each makes different kinds of designs with the paper.

The slotted tool makes a more spiral design, while the comb has a more complex inner structure.

When I first started quilling, I used the slotted tool.

The slotted tool has a small slot between the piece of metal where you insert the paper strip into:
I'm left handed so I like to hold the tool in my left hand and the paper strip in my right, but if it is more comfortable for you to hold them in your opposite hands then do so:)

Once the paper has been inserted, use your fingers to gently start rolling the strip around the tool:

You may have to make some small adjustments to make sure the paper is wrapping over itself and not going all over the place!

Once the paper is completely rolled up, it will look like this:


At this point, you can either choose to glue the end down, or to take it off the tool and allow it to uncoil some, depending on what size and shape you want. You can keep it tightly coiled like this, or let it open up and keep it round, or open it some and shape it into a rectangle, square, triangle, tear drop, or pretty much anything!

Examples of several sizes and shapes are at the beginning of this post in the picture of my 1st quilling practice:) As you can see in the picture, I chose to keep some tightly coiled and opened some others up into bigger circles, flower petals, and rounded triangle shapes.

The other main tool used in quilling is the comb. As mentioned before, you can either use a quilling comb or a regular wide toothed comb.


In order to begin, wrap the strip of paper around at least one of the teeth, or more for different patterns.

Continue wrapping the paper around more teeth of the comb:
Once all the paper has been wrapped around the comb teeth, put a dot of glue on the end to stick it down. You can also put some glue on the beginning end to help hold the middle together.

This is an example of the type of pattern you can create using the comb:
These make more intricate patterns for flower petals and whatever else you design!


Here are a few designs I have made to help get your creative juices flowing:
Owl, using both slotted tool (eyes,beak,feet) and comb (body, wings)
Flower using comb (leaves) and slotted tool with beehive technique (petals)
Roses- didn't use any tool, just my hands, very tricky!
Snowflake Ornament made with slotted tool
Snowflakes (or stars) made with 2 paper strips glued together to make more sturdy, with comb

As you can see, there are many ways to quill! I recommend trying out several different methods and seeing which ones you like the best. Although this is just a beginners guide, I hope you've found it helpful on your new journey into the land of quilling!

Happy quilling:)

Rachael